
You have probably heard the news that Google is shutting down Fusion Tables next December. This simple tool for data visualization will start to see errors in August 2019, as the Fusion Tables Layer in the Maps JavaScript API v3.37 will no longer be supported.

If you have already started looking for Google Fusion Tables alternatives, you’re in the right place. Keep on reading and learn how to easily create a map and analyze location data with GIS Cloud.
Step by step guide to GIS Cloud (for Fusion Tables users)
In this tutorial, you’ll learn how to upload your data, create a map, embed and export the data.
1. Export data from Google Fusion Tables
First things first, you need to export your Fusion Tables to CSV format, a format you can easily open in Google spreadsheets and that works well with GIS Cloud:
- 1. Open a fusion table you want to export
- 2. Click the File menu, then select Download
- 3. Select the CSV format and click Download
Note: GIS Cloud also supports the KML format.
2. Upload data to GIS Cloud
Now let’s upload the data. Login to your GIS Cloud account and enter the Map Editor application. There you can do all sorts of stuff with your location data.
To upload the data navigate to the tools section and open the File Manager. Just drag and drop the data in the box and that is it.
Note: If you only use adresses as location data in your fusion tables it’s best to use the GIS Cloud Geocoder.
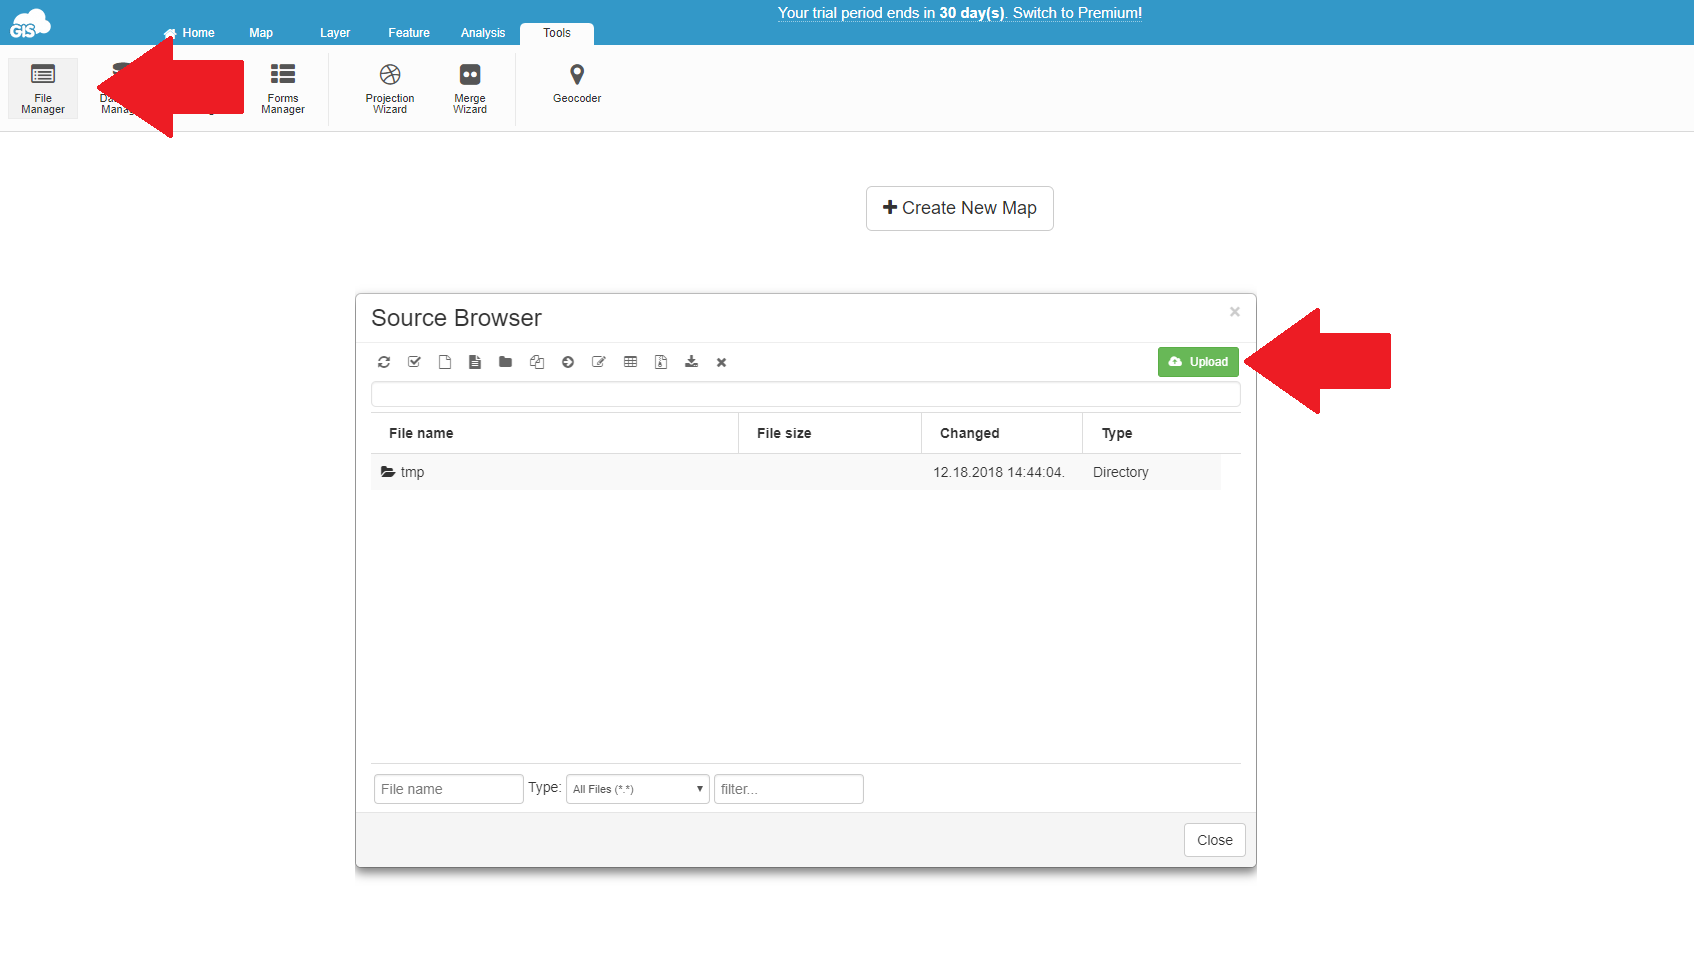
If you need more control over your data and want use the join tables feature, called merge in Google fusion tables, it is best to upload the data directly to the database. You will need to use the Data Manager located right next to the File Manager.
In the Data Manager you can access the join wizard, a tool used for merging tables, we’ll address it later in the article.
3. Create a Map
Now that you have uploaded the data you’ll need to create a map. Click on the Create New Map button, name your map and choose the basemap.
The next step is to add your data to the map. Click on Add Layer and select the desired file. You can also add data from the database.
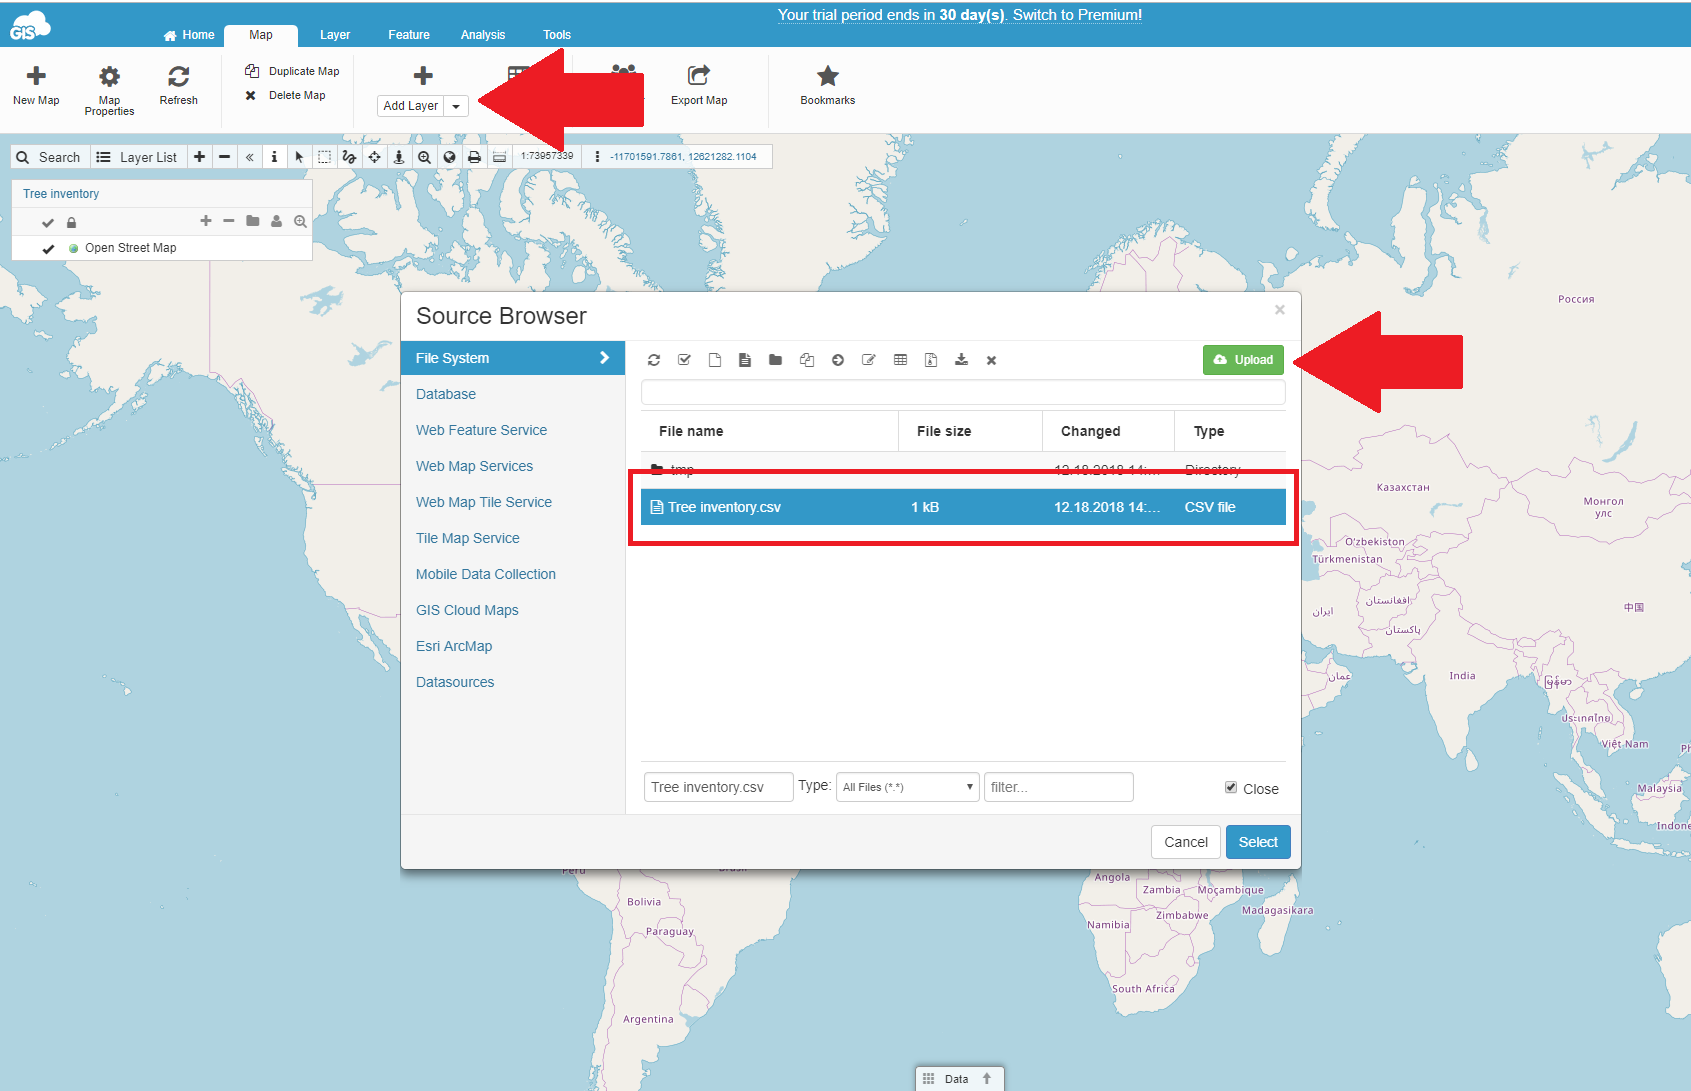
As soon as you upload the file, the data is visualized on a map and ready for editing and sharing.
4. Data styling and classification
GIS Cloud has powerful features for data styling that can help you create a stunning map.
- Apply colors and icons based on your data.
- Create an intensity map for countries, states or provinces.
- Turn data into a map that tells the story visually.
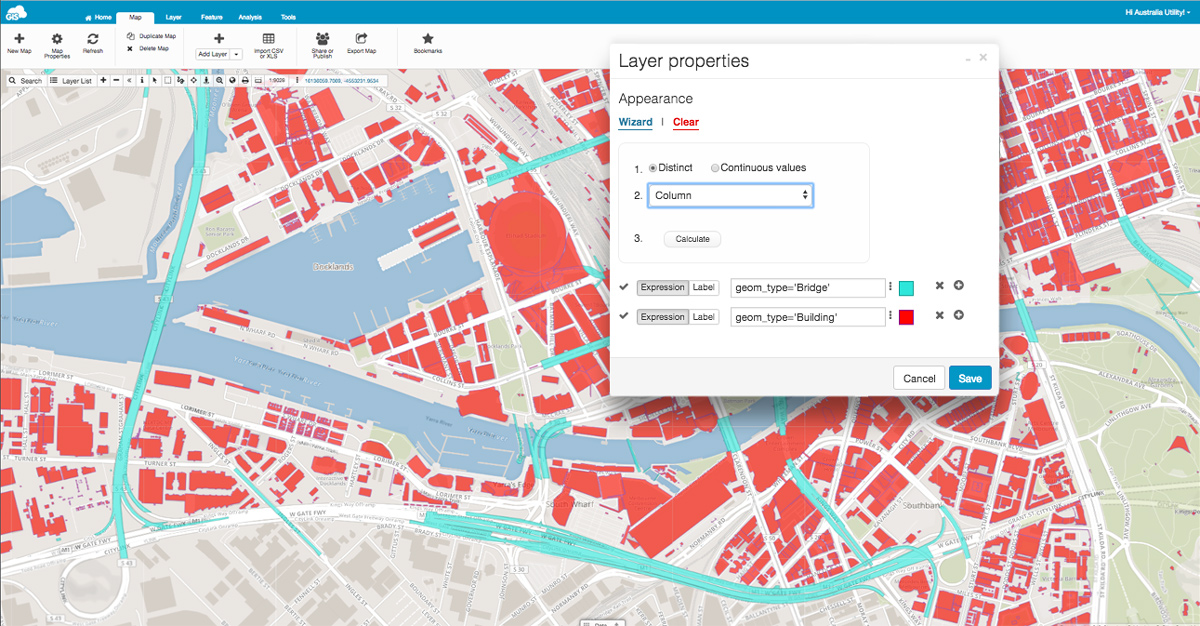
You can modify the display of a layer based on values of its attributes. Operations can be performed based on distinct or continuous values.
Colors are automatically defined for the features, but you can manually assign colors to each feature by selecting the appearance box.
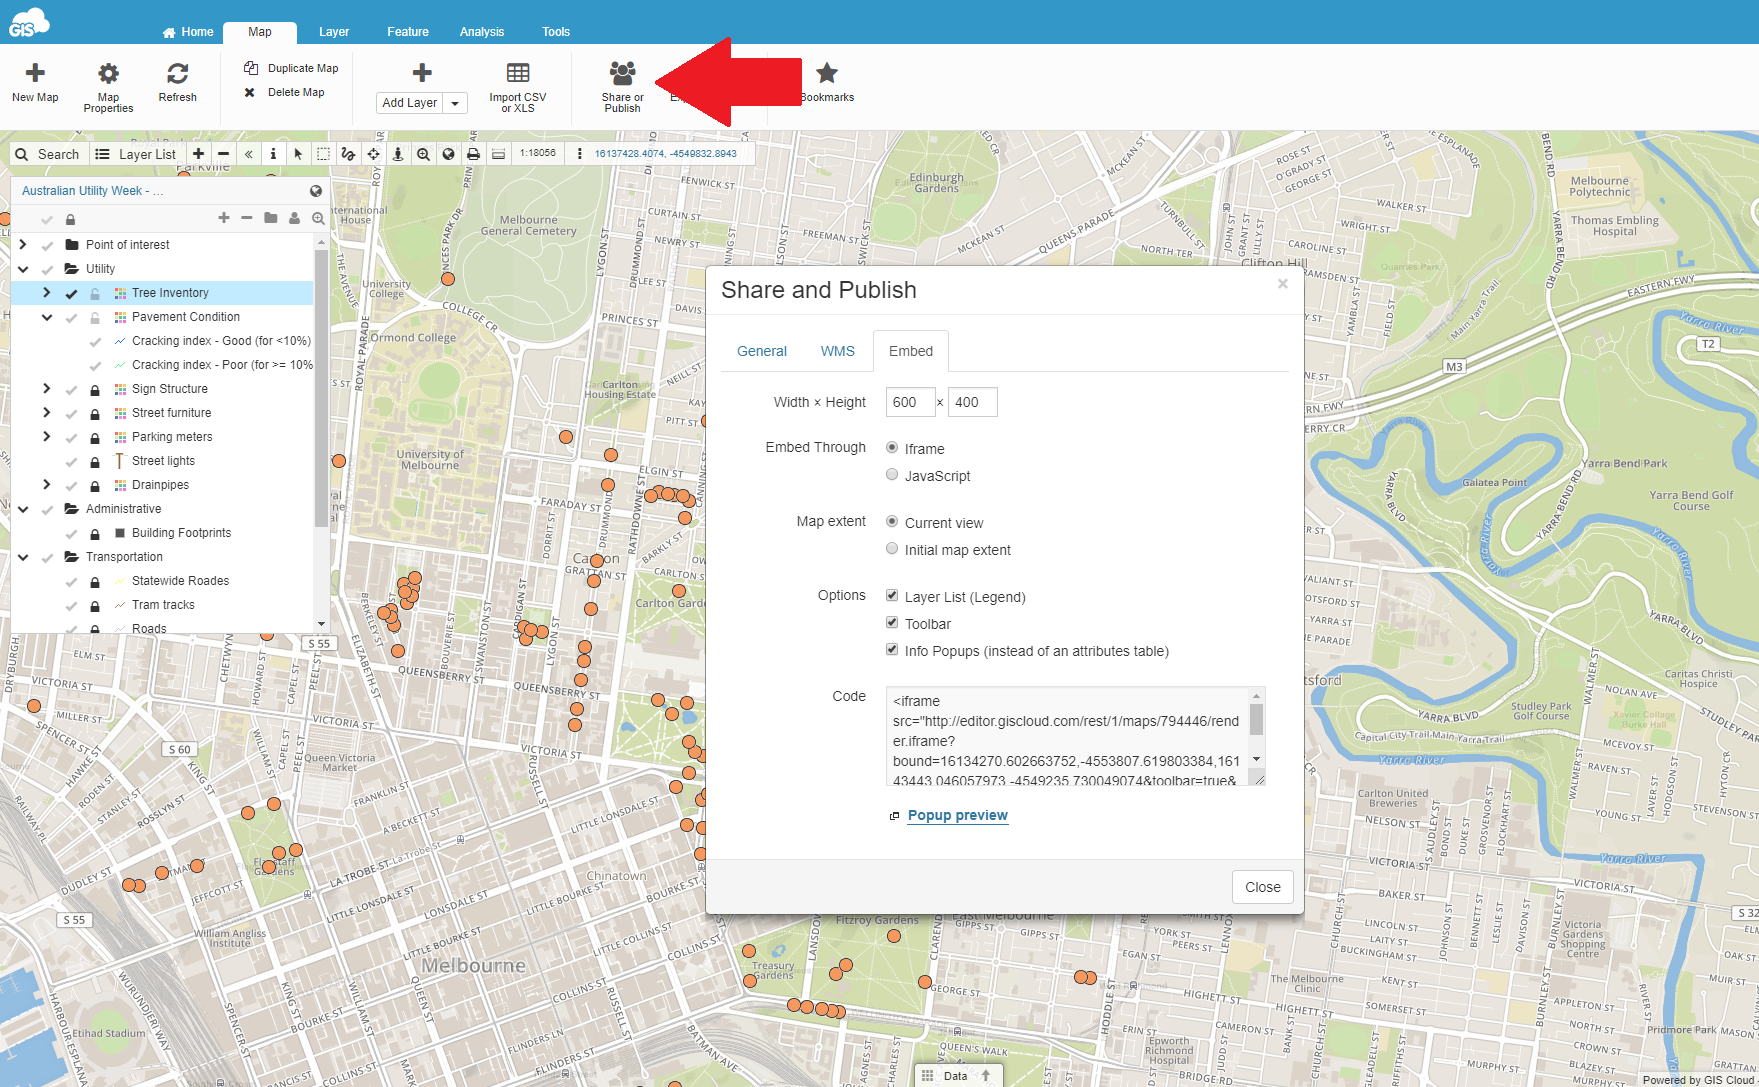
5. Share, embed and publish your map
With GIS Cloud you can share maps with people that also have an account or publish a map to make it accessible to anyone. It is also possible to embed the map to a third party website, just copy the embed code into an iframe.
Access all of these features by clicking the Share or Publish button.
When sharing a map, you have full control over who can view, share, edit or export the map data.
If you decide to make a map public, there’s an option to allow or restrict users to export data.
Regarding the embed map feature, there are a lot of options as well. Choose between iframe or javascript code. Easily adjust the size of the embedded window. You can also use options like layer list (legend), toolbar or pop-ups over features.
6. Select and Export data
There are many ways to select the data you want to export. From simple tools like area selection or freehand selection to more complex tools like the spatial selection. Let’s start with the basics.
Area selection
Select the layer from the Layer List. Click the Area Select tool on the Toolbar. Drag a box to define the area of selected features.
Freehand selection
Similar to area selection but instead of dragging a box you draw the area you want to select.
Selecting data in the grid (data filtering)
Data filtering tool allows you to filter, find and visualize features by its attributes. After filtering the data grid, you can export the filtered data.
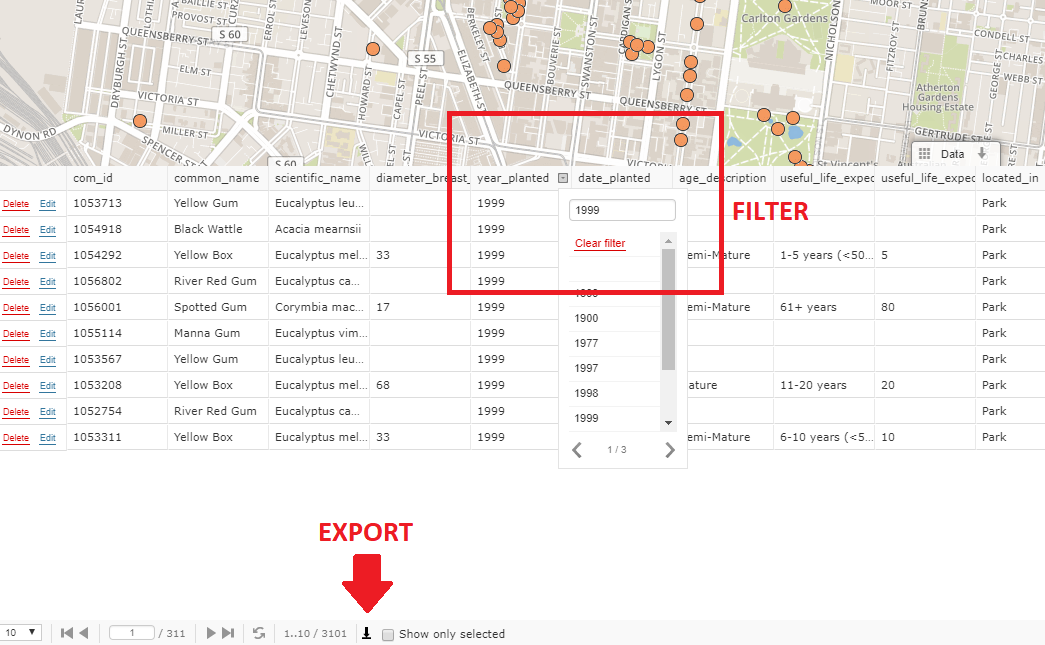
For example, you have a tree inventory and need some info about the trees planted in a specific year and then export the data. First you need to open the data grid, select the column named year_planted and then filter the data by year.
To export the filtered data click on the export button below the data grid to download the data as a csv file.
Spatial selection
Spatial selection allows you to create database queries for layers that reside in the database.
Note that it only works with database layers, not with files. If you want to perform spatial queries, please import the files into the database first.
This tool allows you to select any database feature from any database layer in your Map View. You can select features by attributes or by location depending on what do you need.
If you want to learn more about spatial selection take a look at these examples.
Exporting data in GIS Cloud
Now that you know how to select data you can export it as a ShapeFile (shp), MapInfo (tab), KML, DXF or CSV.
To export data, you need to create a layer from selected data. After you select the data click on the New Layer From Selection button to generate the layer.
To export data follow these steps:
- 1. Select the layer from the Layer List.
- 2. Select the Layer tab.
- 3. Select Export layer option.
- 4. Select an output file format.
- 5. Click the link to download the file.
Supported data formats
When using Google fusion tables you often need to convert files from one format to another because they only support csv. and kml. formats. With GIS Cloud you can use xls, csv, kml, shp and many other formats:
- Spatial Vector files: .shp, .mif, .mid, .tab, .kml, .gpx, .dxf, SQLite
- Spatial Raster files: .tif, .tiff, .jpg, .png, .gif, .img, .ecw, .sid, .jp2
- Image files: .jpg, .gif, .swf, .png, .img, .ecw, .sid, .jp2
- Excel and CSV: .csv and .xls
Merge tables feature
Google Fusion Tables have a merge feature for combining two or three data tables. In GIS Cloud there is a similar feature called JOIN. It allows you to create a new layer with combine attribute data from two separate layers.
Note: To perform join, layer must reside in the Database.
Here you can find an in-depth tutorial about the Join Wizard. The join feature works great as an alternative to fusion tables merge feature.
Interested in GIS Cloud as an alternative to Google Fusion Tables? Contact us.